Incident Reports
When adding a new Incident Report or editing an existing one, you will see several tabs containing different fields. Some of the tabs are dynamic and will only display under specific conditions. If you are importing Incidents from a CAD system, data sent from CAD will be automatically populated into the corresponding Incident fields.
We will look at each tab of an Incident Report. Some tabs will only be available for certain Incident Types, and most Incident Reports will not utilize every tab. Most tabs are organized into several sections of similar or related fields. The fields on each tab are some combination of date/time fields, pop-out selection lists designated by the icon ![]() , drop-down selection lists, toggles, checkboxes, radial buttons, and free-text fields. Required fields have an asterisk (*) and will be highlighted in red.
, drop-down selection lists, toggles, checkboxes, radial buttons, and free-text fields. Required fields have an asterisk (*) and will be highlighted in red.
Note: Some fields and tabs are dynamic and will only display for specific Incident Types or when specific fields are completed or set to ON.
Click on a tab in the image below to learn more.

Click any image in the drop-downs below to enlarge.
The Basic tab is the first tab that displays when opening an Incident. Here you will document general information about the Incident. You will also be able to toggle some other tabs on or off from the Basic tab. The general Incident information you select in the header of the Basic tab will be populated as the header for all the other tabs used in your Incident Report. We will look at each section in a little more detail. You can also watch the video below for an overview.
Incident Type and Initial Dispatch Code
Incident Type codes are three digits by default. These codes are provided by the National NFIRS system. Software administrators can create plus one codes for Incident Types and most other NFIRS controlled codes in the system. Plus one codes allow for an additional level of specificity and are typically defined by your state. Entering a code will populate the description. You can also start typing a description to search the Incident Type list and choose the type you need. Clicking the pop-out icon ![]() will display all the available Incident Type codes, descriptions, and an additional explanation (hover over the tooltip) about the type.
will display all the available Incident Type codes, descriptions, and an additional explanation (hover over the tooltip) about the type.
The Initial Dispatch Code field functions just like the Incident Type field and can be used to document the original Incident Type code the Incident was dispatched under.
You will also notice the Incident Date and Incident Number fields below the Incident Type field. These fields will be auto-populated with the date the Incident was created and the next sequential unique Incident Number. The CAD Number field is free-text and the Fire Station field is a drop-down selection list.
Location
The first address section of the Basic tab is the location of the Incident. You can begin typing an address into the 'Google Search an Address' field to select from geocoded addresses provided by Google. You can also use the Select Common Address field to select from the list of Common Addresses added in ZOLL emsCharts.
Note: If the address you select matches the address of an exisitng Occupancy, you will see a prompt asking if you wish to import the Occupancy information. Selecting Yes will automatically import all the Occupancy information into the corresponding Incident Report fields. Other fields that may be populated include Property Use on the Basic tab and various fields on the Structure tab when it is available for the report.
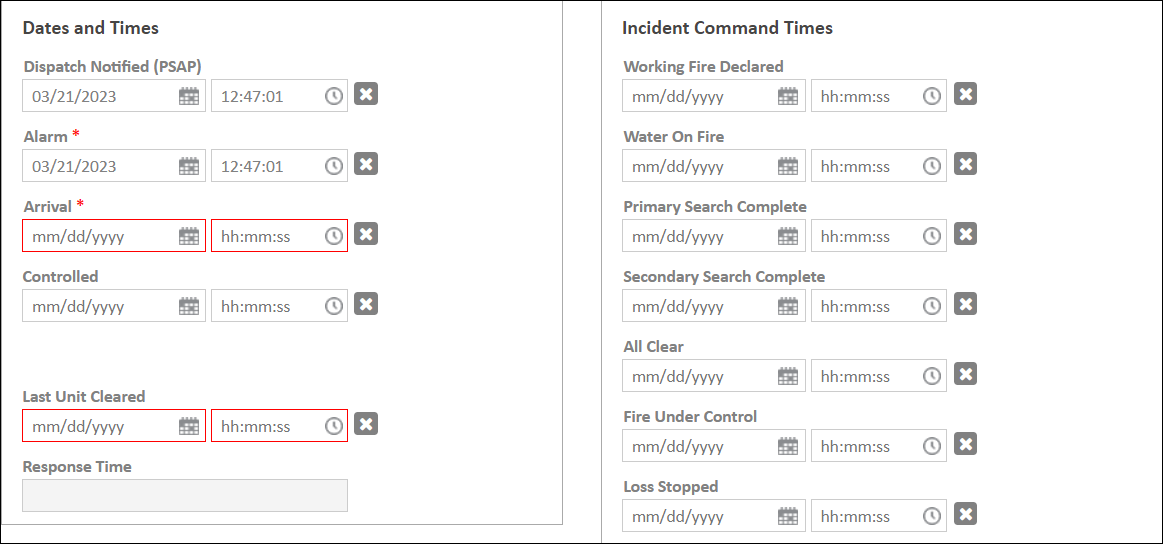
Dates and Times / Incident Command Times
The 'Dates and Times' and 'Incident Command Times' sections contain the Incident related date and time fields. You can type in the values or use the calendar and clock icons to add values.
Casualty, Extrication, Wildland, and HazMat toggles
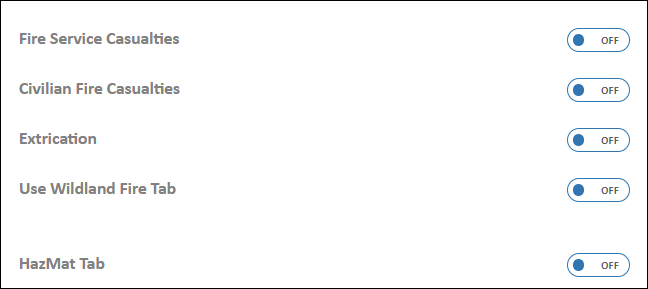
Depending on the Incident Type selected, this section will display up to five different toggles that, when switched to ON, will display a corresponding tab of the same or similar name: 'Fire Service Casualties', 'Civilian Fire Casualties', 'Extrication, 'Use Wildland Fire Tab', and 'HazMat tab'.
Note: The displayed toggles are dynamic and will only appear when they are relevant to the Incident Type selected for the report.
Shift and Alarm
Document your shift and alarm information in this section. All fields are drop-down selection lists.

Property Use
You can document property use information in this section. Entering a code in the Property Use field will populate the description. You can also start typing a description to search the Property Use list and choose the value you need. Clicking the pop-out icon ![]() will display all the available Property Use codes and descriptions. The Mixed Use Property field is a drop-down selection list.
will display all the available Property Use codes and descriptions. The Mixed Use Property field is a drop-down selection list.

Estimated Dollar Losses and Values
You can document the estimated property and content losses in the free-text fields.

Aid Given or Received
Document any aid you have given or received in the drop-down selection list.

Detector
Document whether or not a detector alerted occupants.

Actions Taken
Entering a code in the Actions Taken field will populate the description. You can also start typing a description to search the Actions Taken list and choose the value you need. Clicking the pop-out icon ![]() will display all the available Actions Taken codes and descriptions. If you need to enter multiple Actions Taken, add one and then click Add to display another Actions Taken field below the first. Additional Actions Taken fields will have a delete icon
will display all the available Actions Taken codes and descriptions. If you need to enter multiple Actions Taken, add one and then click Add to display another Actions Taken field below the first. Additional Actions Taken fields will have a delete icon ![]() you can use if you don't need them.
you can use if you don't need them.
The Hazardous Materials Release field is a drop-down selection list. Selecting a Hazardous Materials Release value will cause the Hazardous Materials tab to display. Checking the HazMat Tab box will make some fields on the Hazardous Materials tab required.

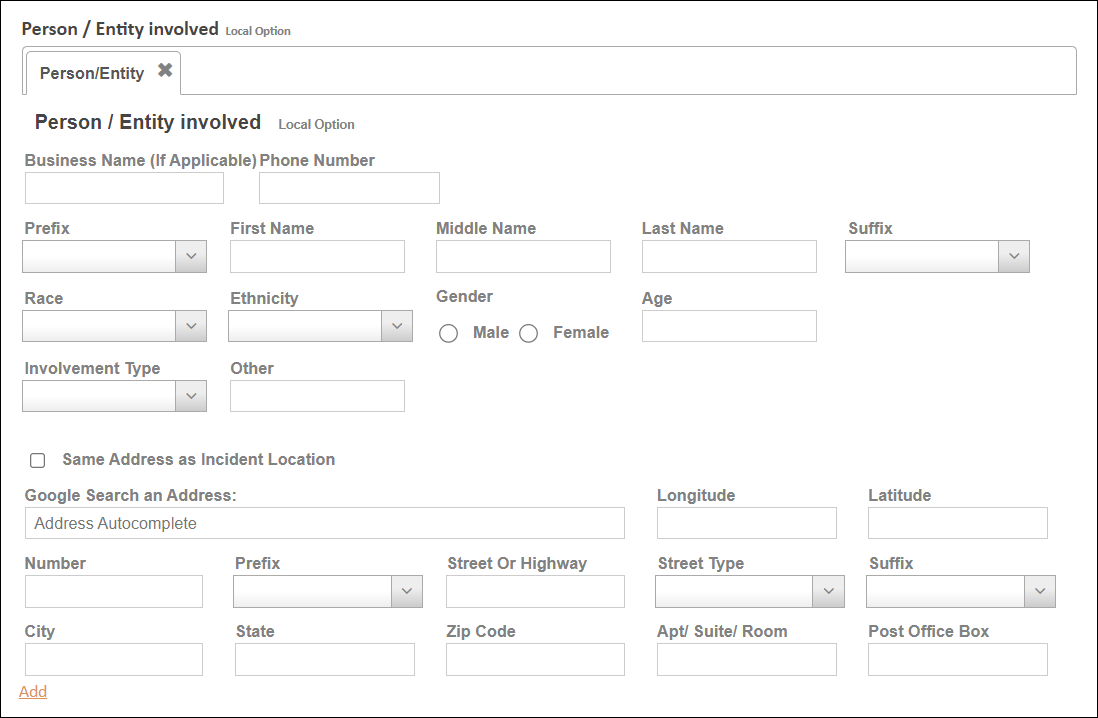
Person / Entity Involved
You can document information about any people or businesses involved. This section includes free-text fields, drop-down selection lists, radial buttons, and Google address search fields for location information. Check the 'Same Address as Incident Location' box to populate the address fields with the same address from the Location section at the top of the Basic tab. You can also click Add to create multiple Person/Entity tabs to document more than one person or business involved.
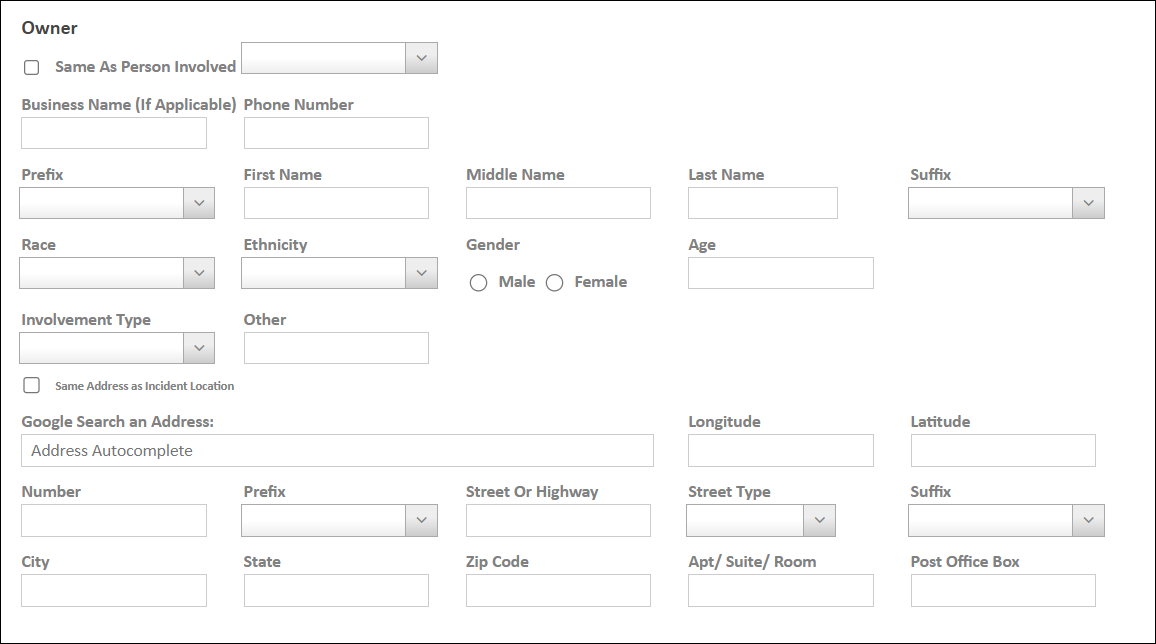
Owner
Capture information about the owner of the property. This section includes free-text fields, drop-down selection lists, radial buttons, and Google address search fields for location information. Check the 'Same As Person Involved' box to populate the applicable fields with the same information as a person documented in the 'Person / Entity Involved' section. If there are multiple people involved and you check the 'Same As Person Involved' box, you can select the correct one from the drop-down field. Check the 'Same Address as Incident Location' box to populate the address fields with the same address from the Location section at the top of the Basic tab.
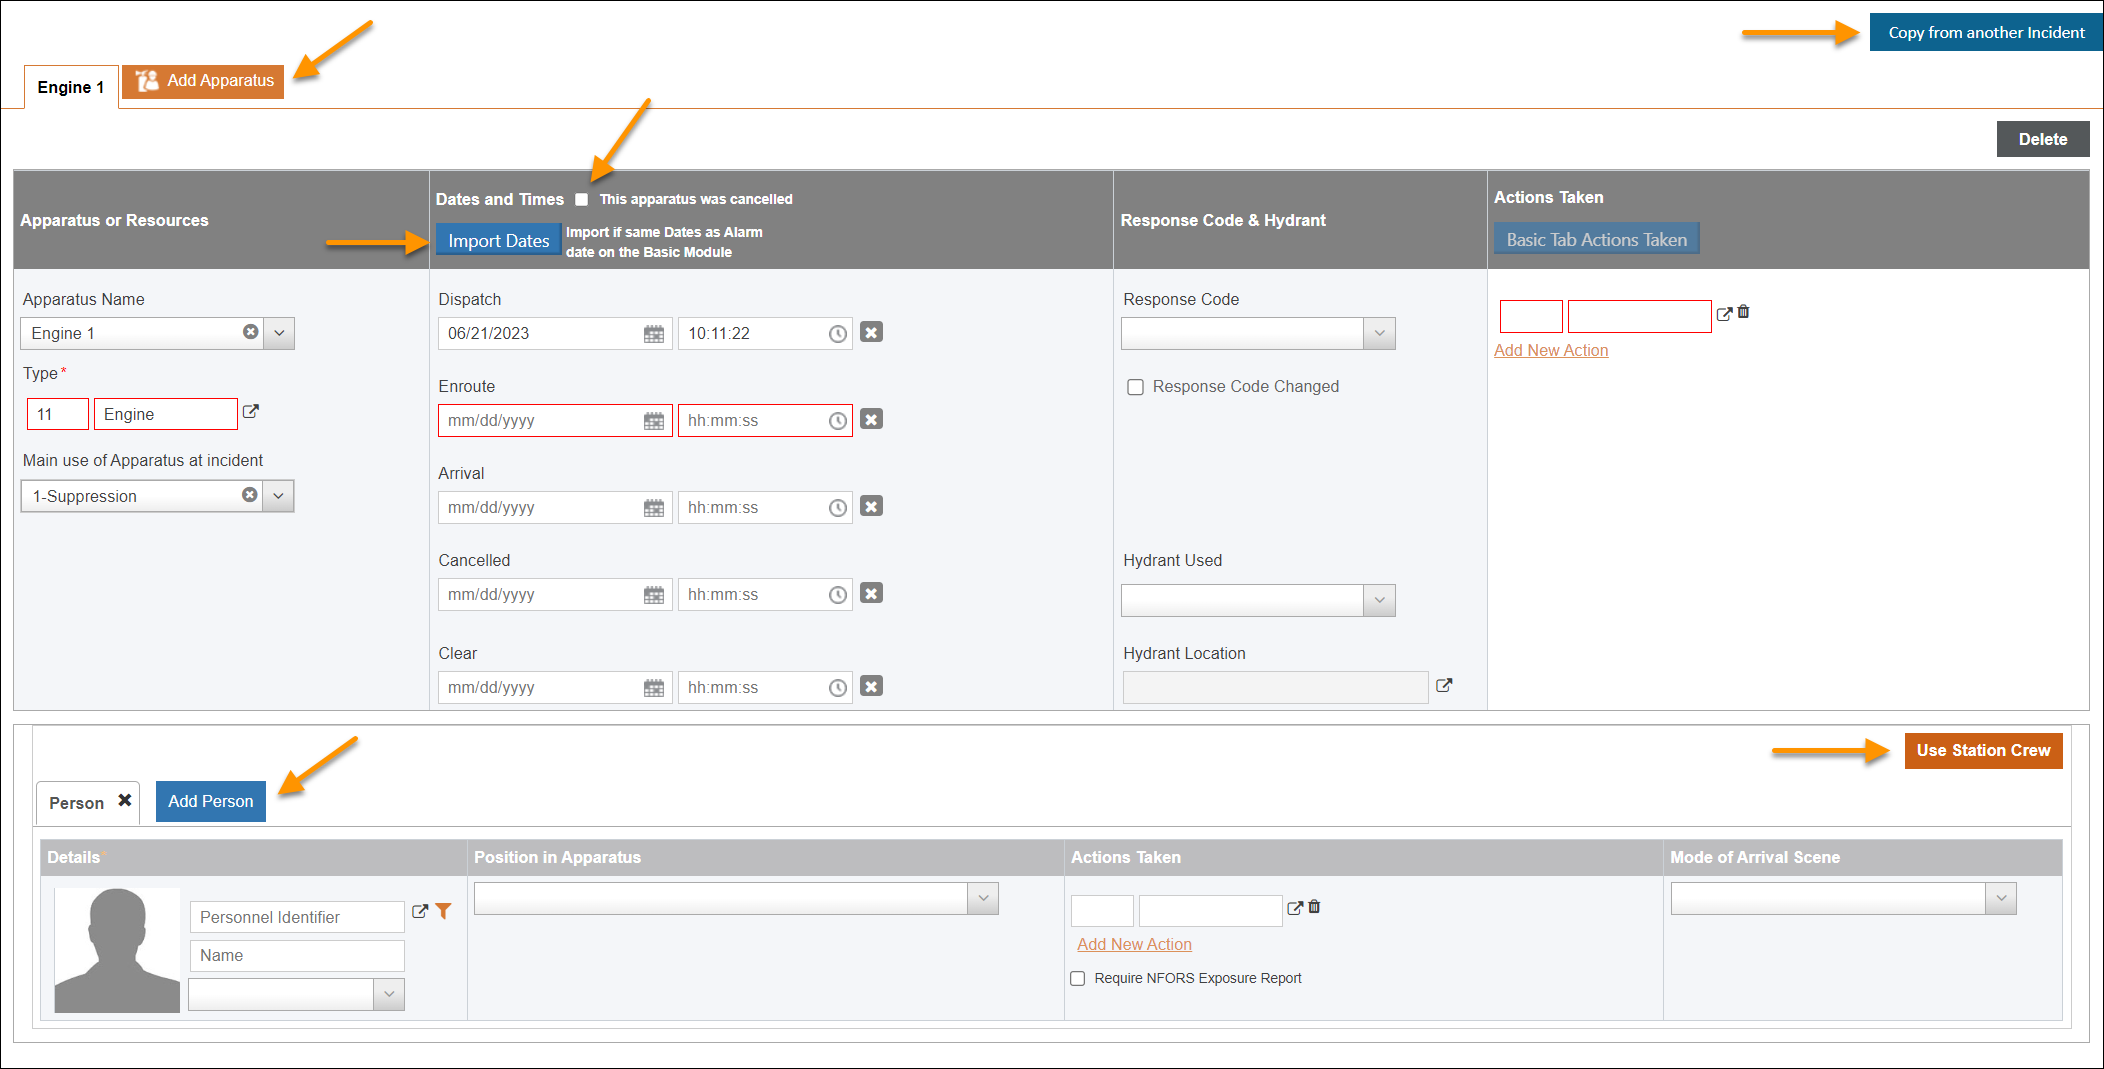
Document your apparatus information including timestamps, response codes, hydrant information, and actions taken. Document your personnel information including position in vehicle, actions taken, and mode of arrival to scene. You can click Copy from another Incident to import the apparatus and personnel information from another Incident Report, or enter it manually.
Clicking Add Apparatus or Add Person will add additional tabs to document more vehicles or personnel.
Notes:
-
Click Import Dates in the Apparatus or Resources section to import the timestamps if they are the same as the Alarm date on the Basic tab.
-
When you check the 'This apparatus was cancelled' box in the Apparatus Dates and Times section, the '93 - Cancelled en route' Action will automatically be selected for that apparatus, and any data entered in the Arrival and Clear date/time fields will be cleared.
-
Once an apparatus is selected, personnel assigned to that apparatus on the Duty Roster or Crew will be populated in the Person fields available below each listed Apparatus. You can also add personnel as having reported to the station for the Incident by documenting them in the Personnel Reported To Fire Station section.
-
Click Use Station Crew in the Person section of the Apparatus selection to import crew information if it exists in the Duty Roster for the Station.
If your Service has it enabled, you will see a section at the bottom of the tab labeled "Personnel Reported To Fire Station". Here you can document any personnel who arrived at the station but did not respond to the scene. Personnel documented in this section can sign-off on the Incident Report if they have the proper security permission.
Configurations:
-
ZOLL emsCharts > Configuration > Service > Fire > General Setup > General Configuration > Personnel Reporting to Fire Station = ON
-
ZOLL emsCharts > Configuration > Service > Code Tables > Security Roles > [select Security Role] > Fire Reports - NFIRS > Enable Incident Sign-off
The Fire tab is used to document general information related to a fire Incident and will only be available to select if the Incident Type selected on the Basic tab indicates a fire. We will look at each section in a little more detail.
Property Details
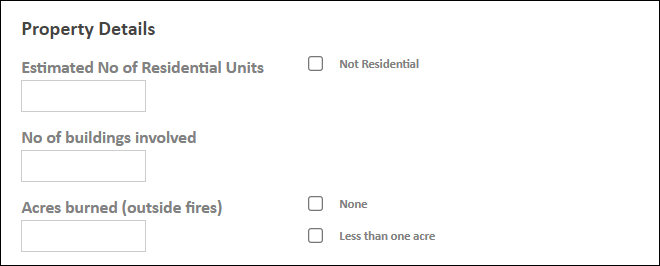
Document the number of residential units, buildings, and acres involved in the fire.
OnSite Materials or Products
You can add information about any materials and their use that were on the site of the fire.
Note: Click Add to document multiple materials but only the first three documented will be reported to NFIRS.

Ignition
Document the origin, first items ignited, heat source, and type of material involved in the ignition as well as the cause and any human contributing factors.
Factors Contributing to Ignition
Select the factors contributing to the ignition.
Note: Click Add to document multiple factors.

Fire Suppression Factor
Document any scenarios that factored into the fire suppression.
Note: Click Add to document multiple factors.

Equipment Involved in Ignition
Enter information about any equipment that was involved in the ignition.
Note: Click Add to document more than one piece of equipment, but only the first one documented will be reported to NFIRS.
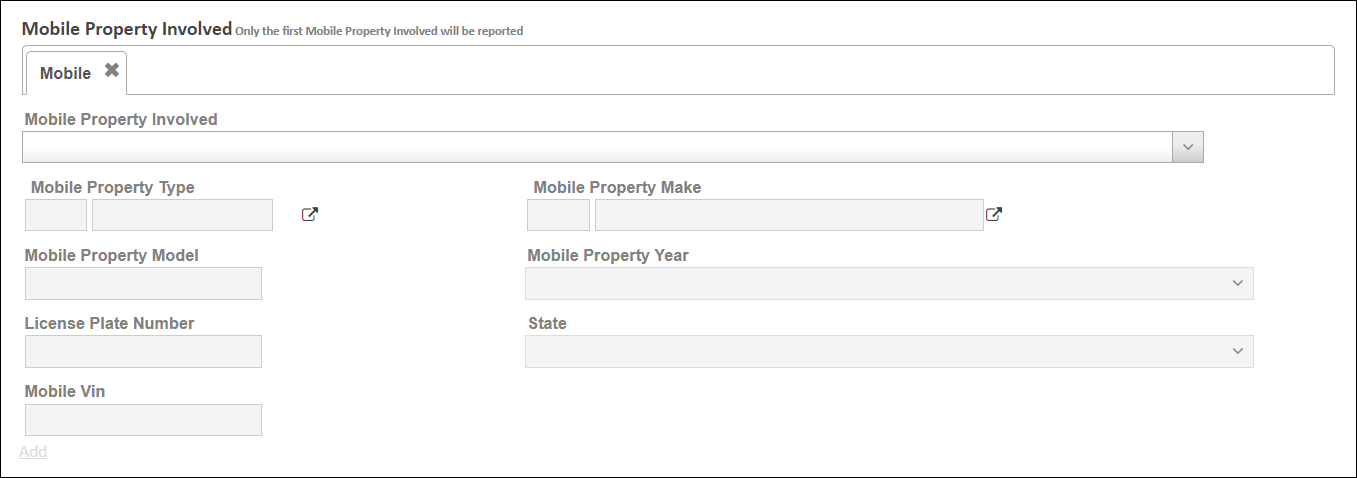
Mobile Property Involved
Enter information about any mobile property that was involved in the fire.
Note: Click Add to document multiple mobile properties, but only the first one documented will be reported to NFIRS.
PreFire Plan Available
Check the PreFire Plan Available box if you have a fire pre-plan for the Incident.
Note: This is an optional data element for NFIRS. When the box is checked, ZOLL Fire Reports will include the data element in the NFIRS Export to satisfy the NFIRS Complete Reference Guide note: "...this indicates that some of the information presented in this report may be based upon reports from other agencies."

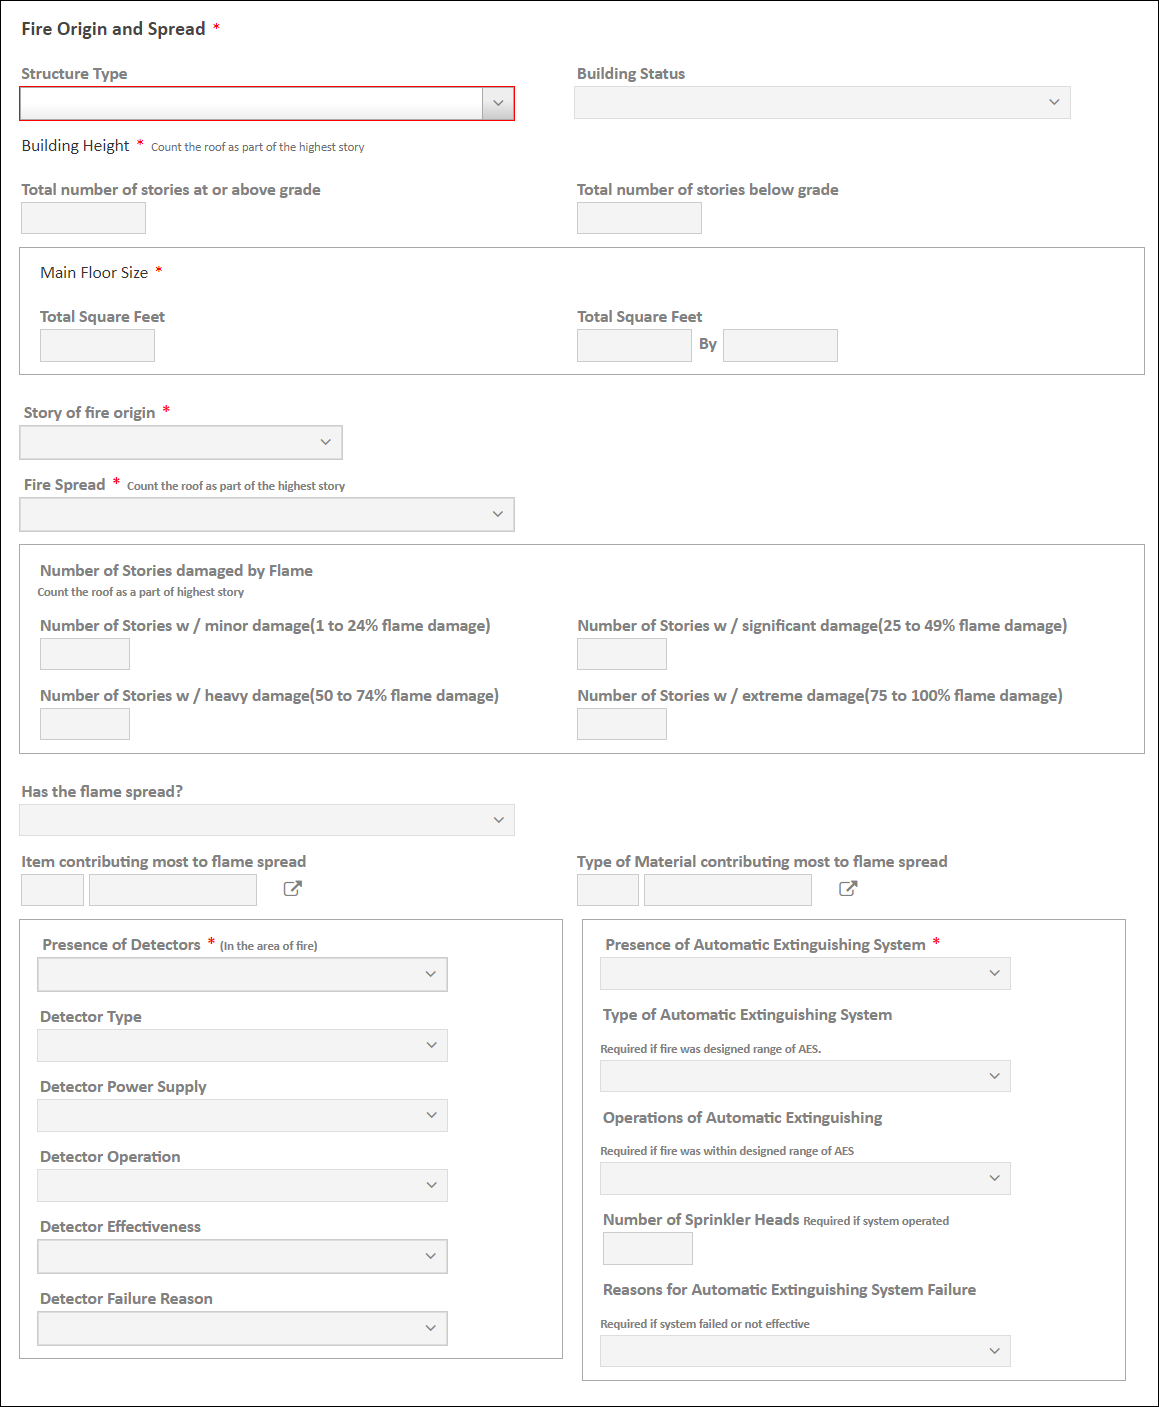
The Structure Fire tab will be enabled if the Incident Type selected on the Basic tab indicates a structure fire. If a structure was involved in the fire, use the Structure Fire tab to document information about the structure and the origin and spread of the fire throughout the structure. Working from the top down you will document general information about the structure and its size, how the fire spread throughout the structure and how much damage it caused, and details about any fire detectors or suppression systems the structure was equipped with.
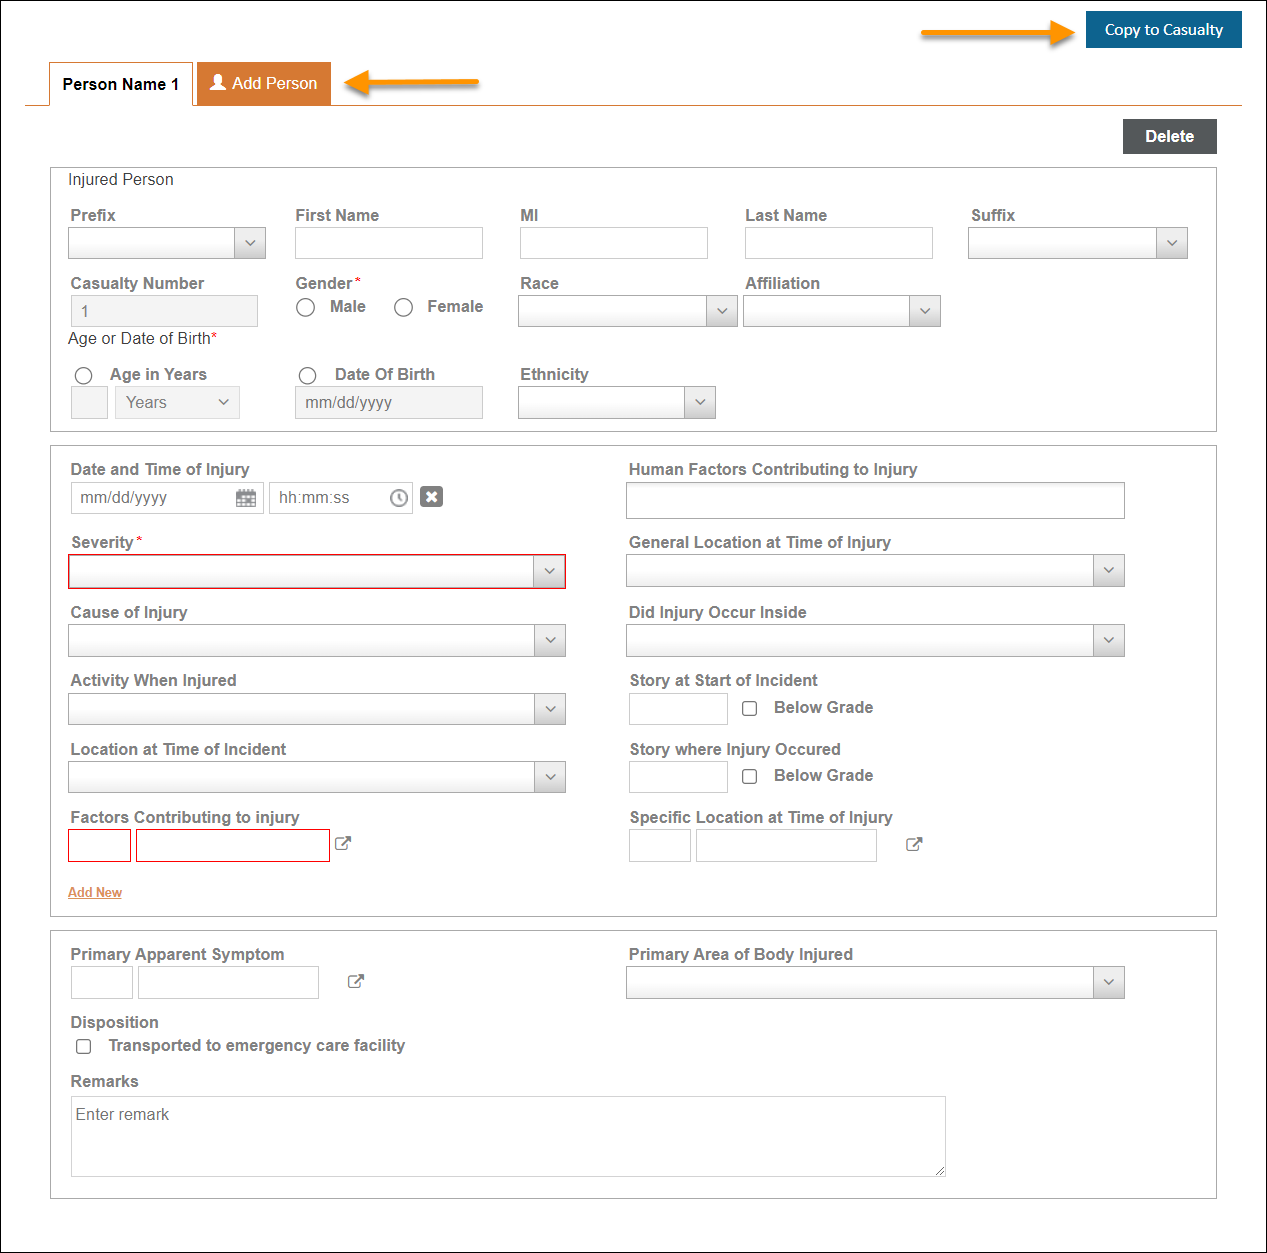
The Civilian Fire Casualty tab will be enabled if you set the Civilian Fire Casualties toggle on the Basic tab to ON. If there were any civilian casualties, document them on the Civilian Fire Casualty tab. Working from the top down you will document demographic information about the injured person(s), details about the injury, and symptoms and disposition of the injured person(s).
Click Copy to Casualty then Save Changes to copy any casualty information entered in the 'Person / Entity Involved' section of the Basic tab into the corresponding Injured Person fields on the Civilian Fire Casualty tab.
Click Add Person to create a new tab to document multiple civilian casualties.
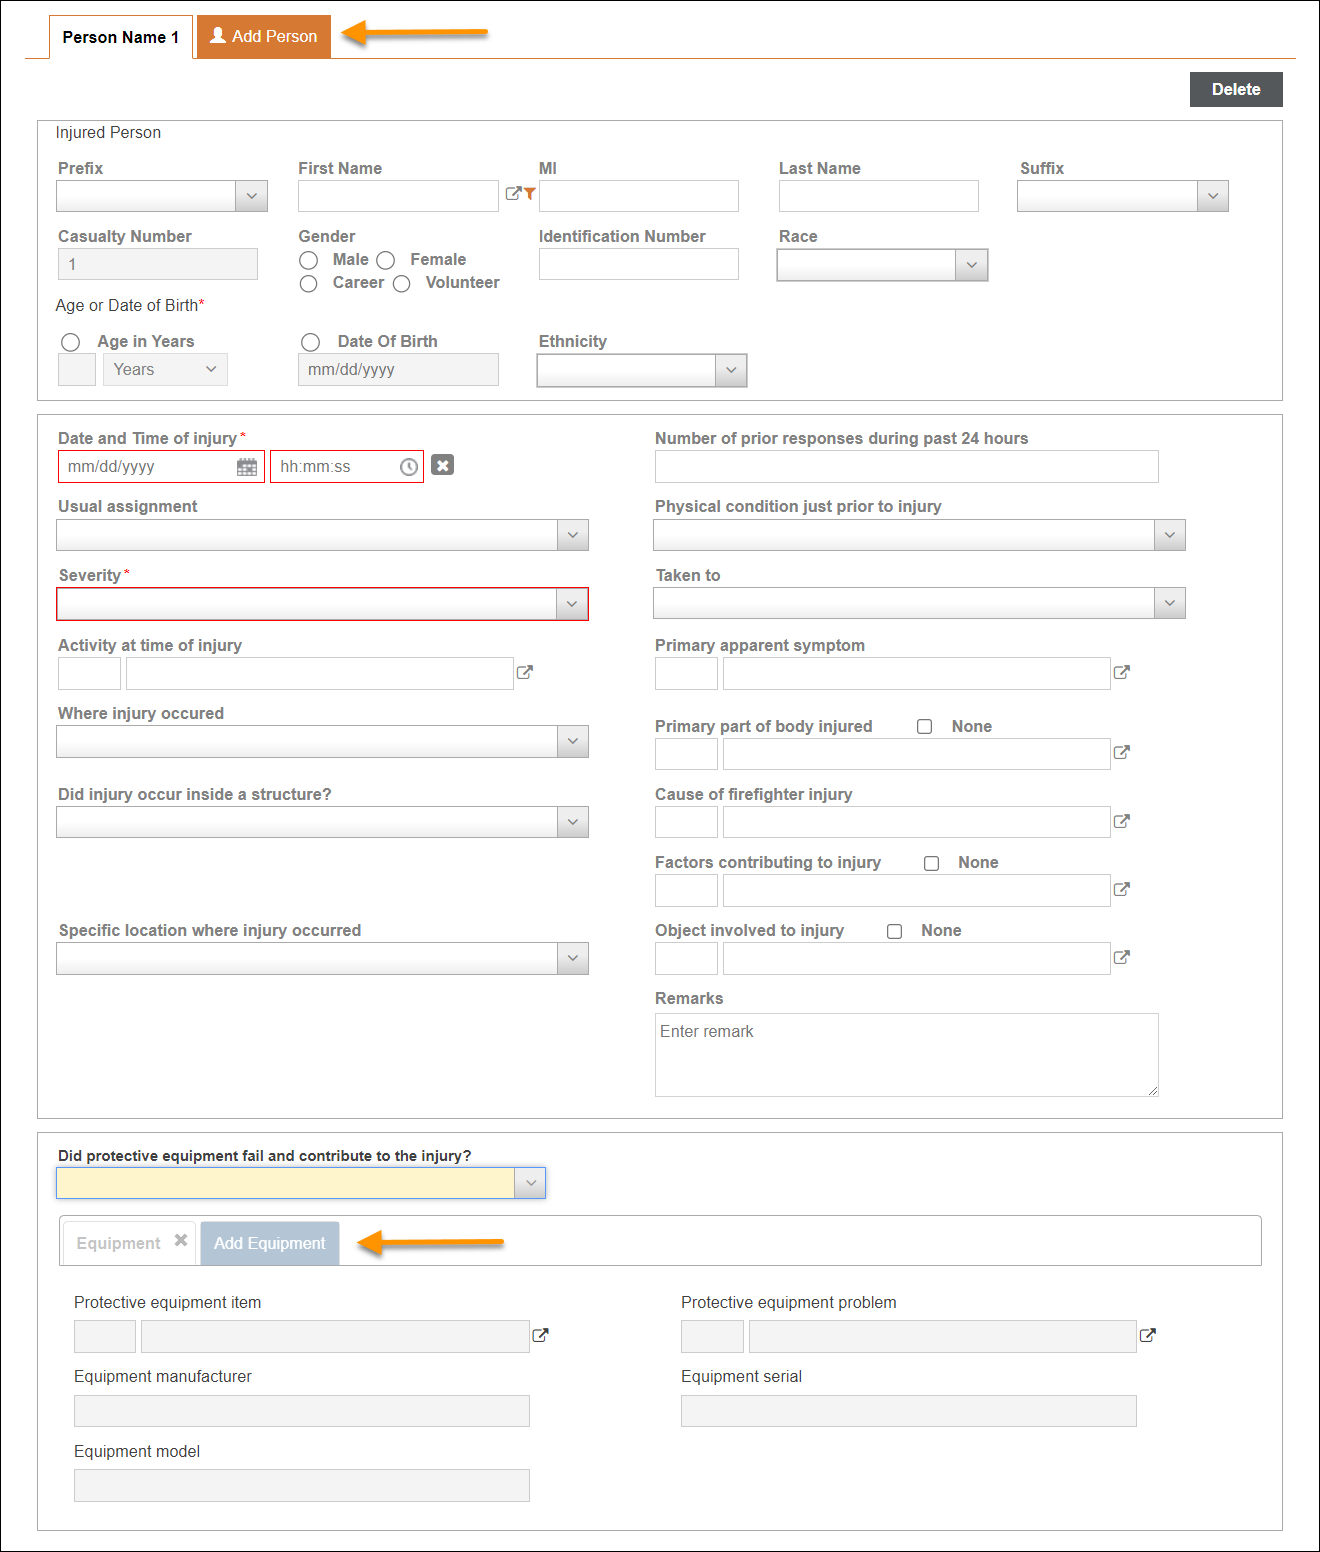
The Fire Service Casualty tab will be enabled if you set the Fire Service Casualties toggle on the Basic tab to ON. If any of your personnel were injured, document it on the Fire Service Casualty tab. Working from the top down you will document demographic information about the injured person(s), details about the injury and where it occurred, symptoms of the injured person(s), and information about any protective equipment they were wearing or using.
Click Add Person to create a new tab to document multiple civilian casualties. Click Add Equipment to create a new tab to document multiple pieces of equipment.
Note: The filter icon next to the Injured Person name fields is used for filtering out users who are hidden/disabled in your Service. By default, hidden/disabled users will not be included but if you click the filter icon and then uncheck the "Exclude Hidden Users" checkbox, hidden/disabled users will be included in the name lookup.
The EMS tab is used to view, edit, or create Patient Care Records linked to the Incident. Any PCR's linked to the Incident will be displayed in the grid.
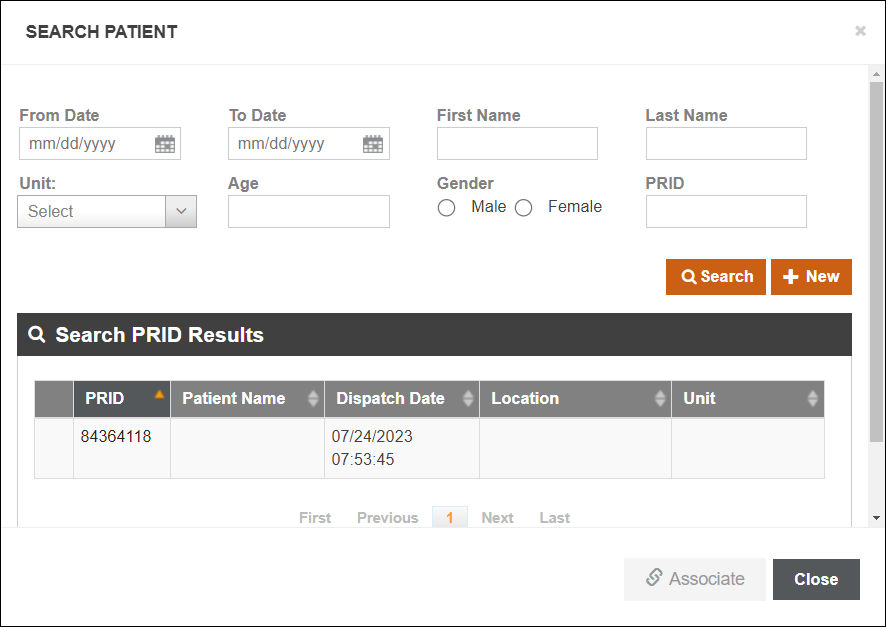
If you don't see the PCR you need, you can click Create PCR to create a new PCR in ZOLL emsCharts, or you can click Search PRID to open a search window where you can enter Incident and patient details to search PCR's in ZOLL emsCharts. Once you find the PCR you need, you can click the PRID to open it in ZOLL emsCharts, or you can select it and click Associate to link it to the Incident.
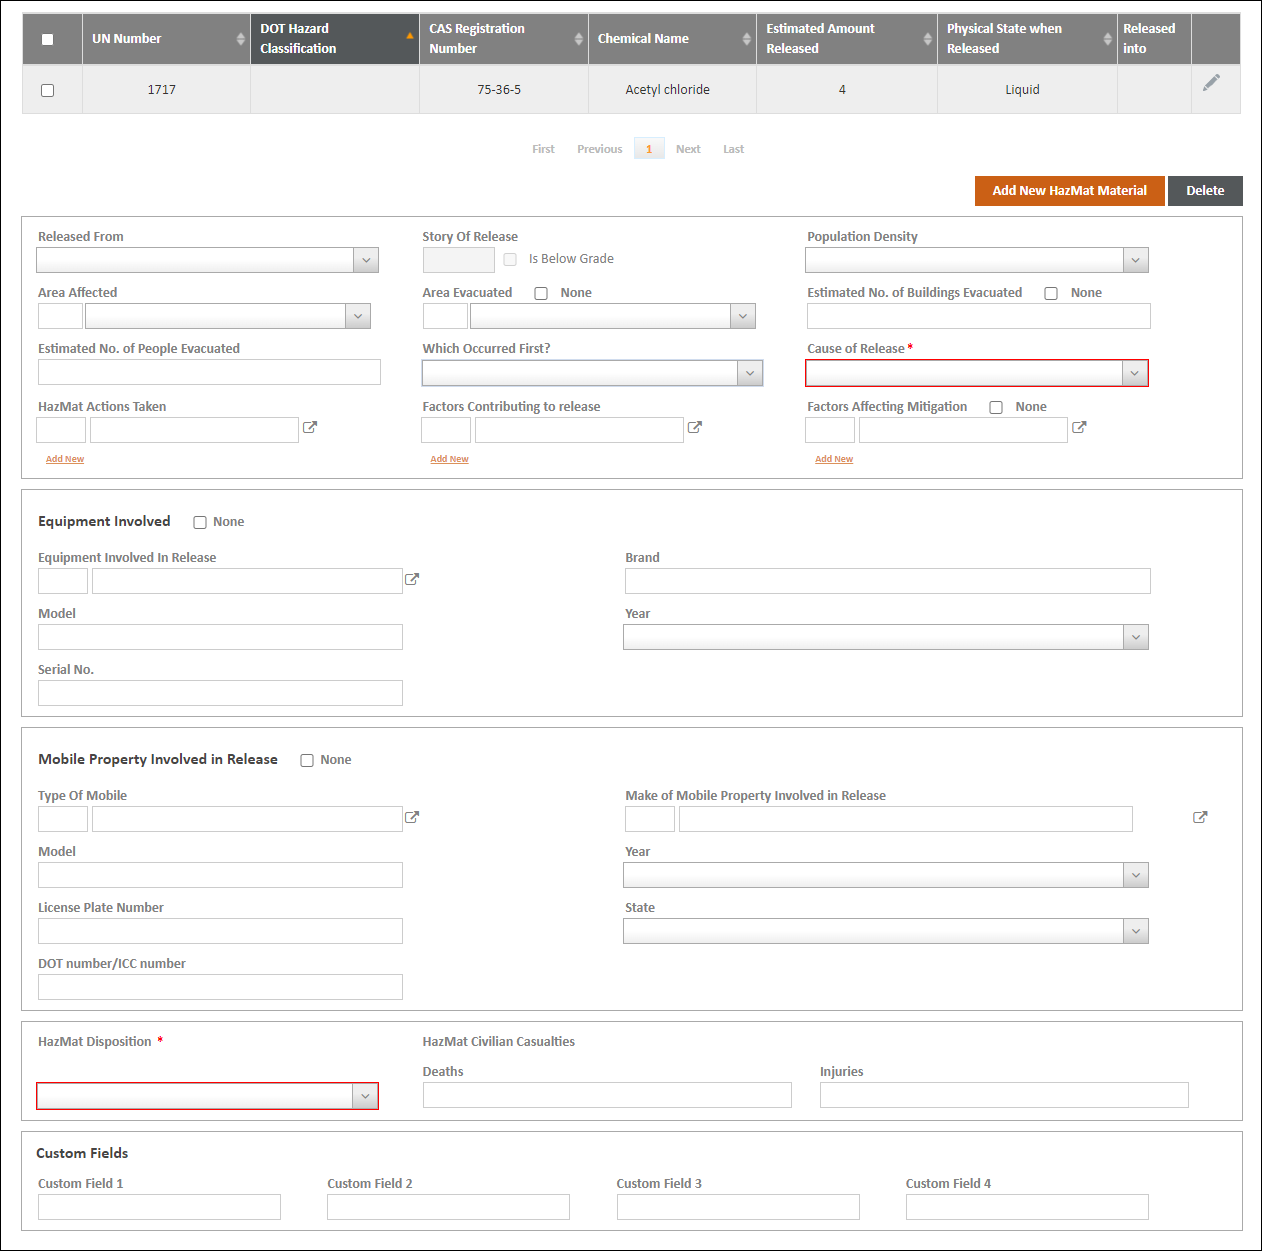
The Hazardous Materials tab will be enabled if you set the HazMat Tab toggle on the Basic tab to ON after selecting a code in the Hazardous Materials Released field. The toggle is automatically set to On when you select code '0-Special HazMat actions required or spill >= 55 gallons'. Document information about the hazardous materials on the Hazardous Materials tab. Record the details about how the hazardous materials were released, any equipment involved, mobile property involved, and the disposition and civilian casualties if any. If your administrator has configured Custom Fields for the Hazardous Materials tab, these will be available at the bottom.
Click Add New HazMat Material to enter information about the hazardous material(s) to the Incident. Hazardous materials you add will display in the grid at the top of the page.
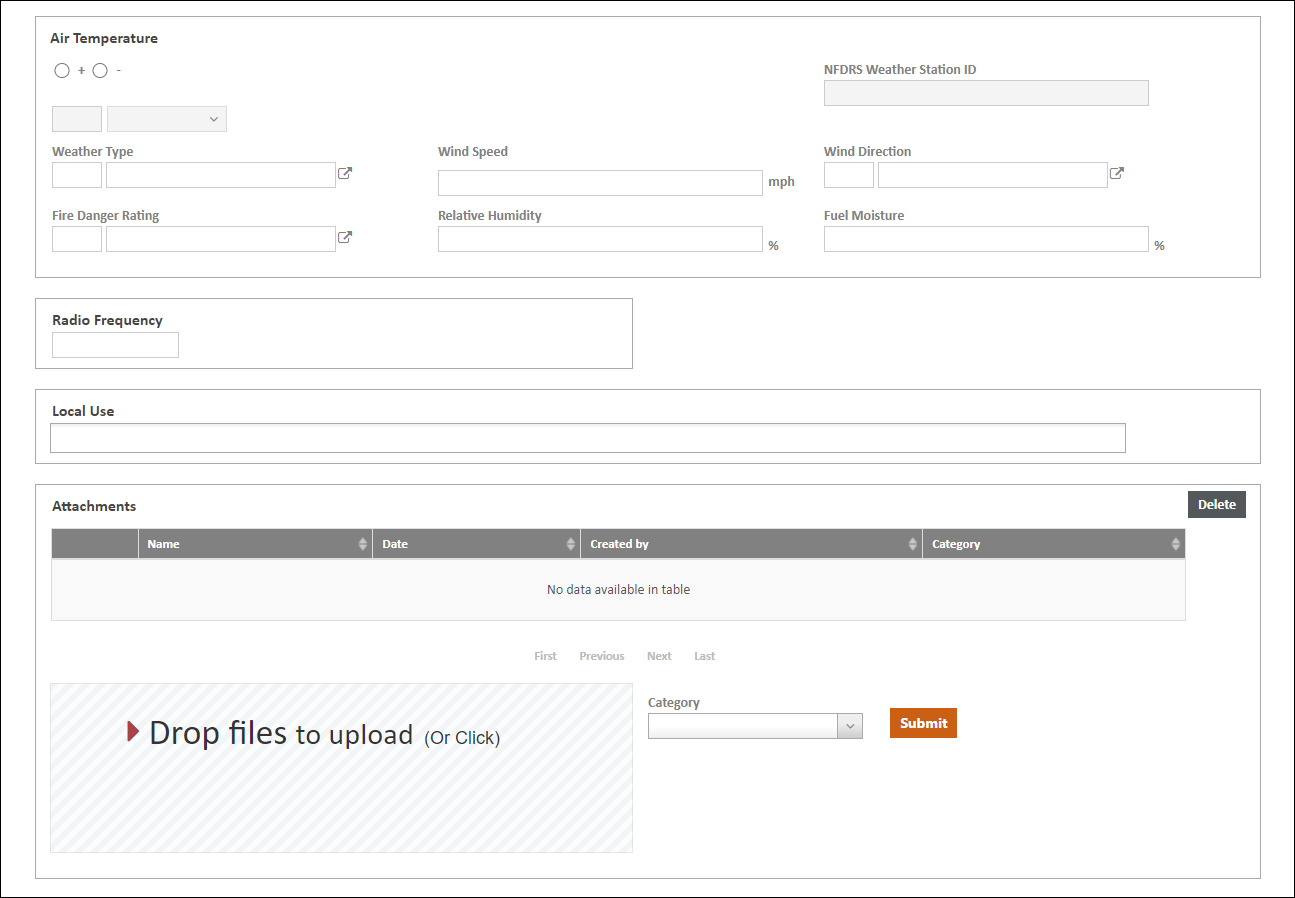
The Wildland Fire tab will be enabled if you set the Use Wildland Fire Tab toggle on the Basic tab to ON. Document information related to a wildland fire on the Wildland Fire tab. The Wildland Fire tab is organized into several sections of similar or related fields. We will look at each section in a little more detail.
Alternate Location Specification
Document additional location information including the type of area, cause of the fire, contributing human factors, and the source of the heat.
Factors Contributing To Ignition, Fire Suppression Factor, and Primary Crops Burned
Enter details about contributing ignition factors, suppression factors, types of crops burned, and number of buildings and acres burned.
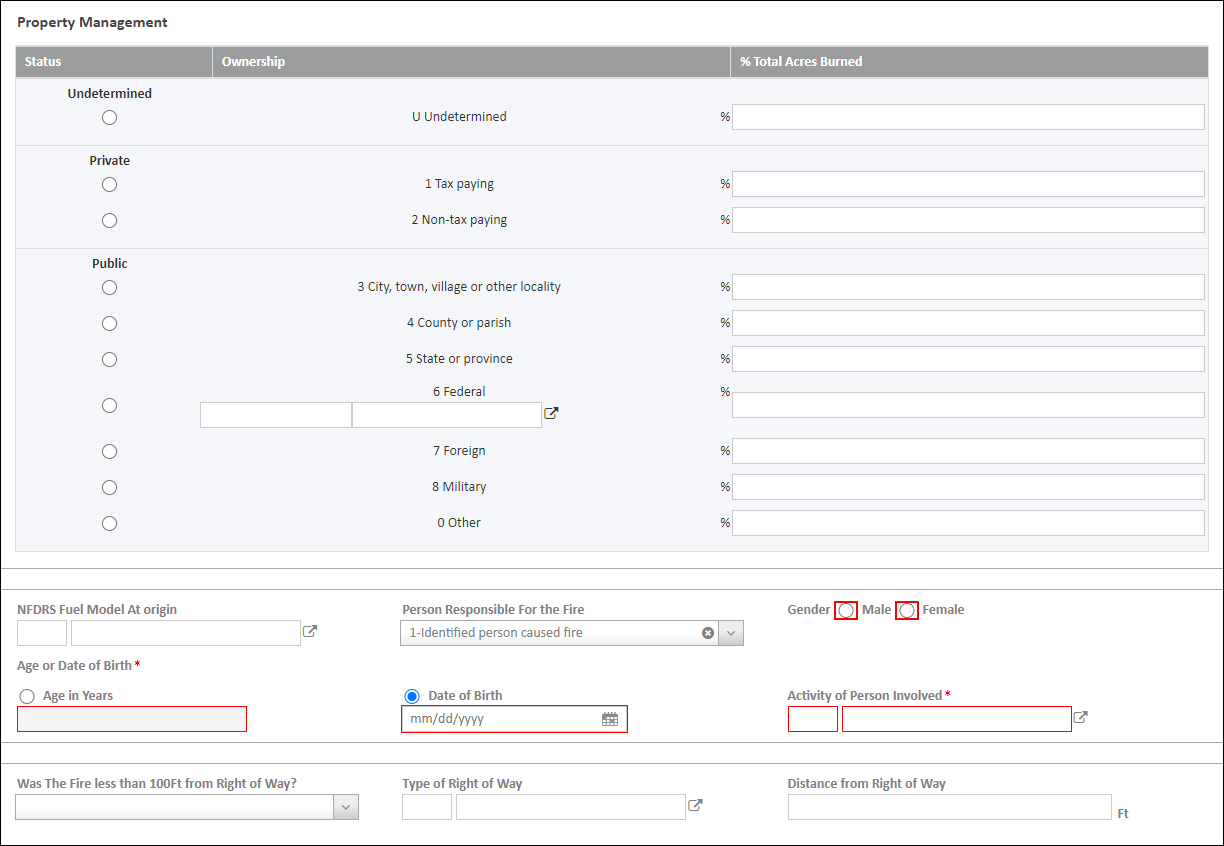
Property Management
Select the type of ownership for the property and the percentage of total acres burned. This section also includes fields for documenting demographic information about the person and activity responsible for the fire and if the fire was near a right of way.
Fire Behavior
Document details about the fire and its behavior.
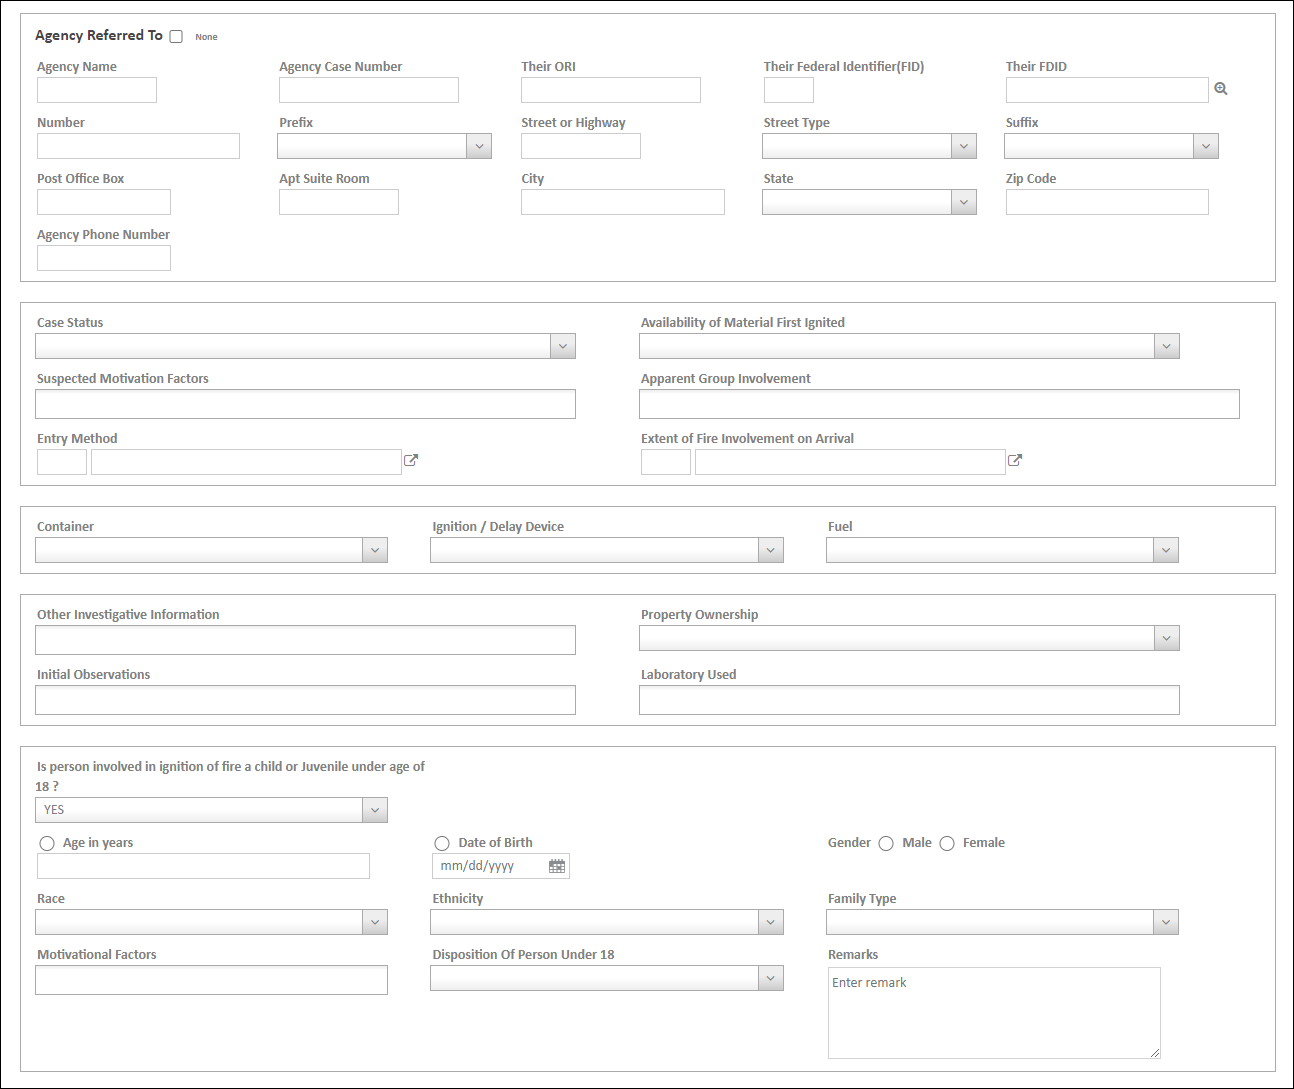
The Arson tab will be enabled if the Cause Of Ignition on the Fire tab is set to '1-Intentional', '2 - Unintentional', '5-Cause under investigation', or 'U-Cause undetermined after investigation'. Document the details of your arson investigation including any agency you are referred to, status of the investigation, materials involved, motivation factors, ignition and fuel information, observations, and the person involved in the ignition.
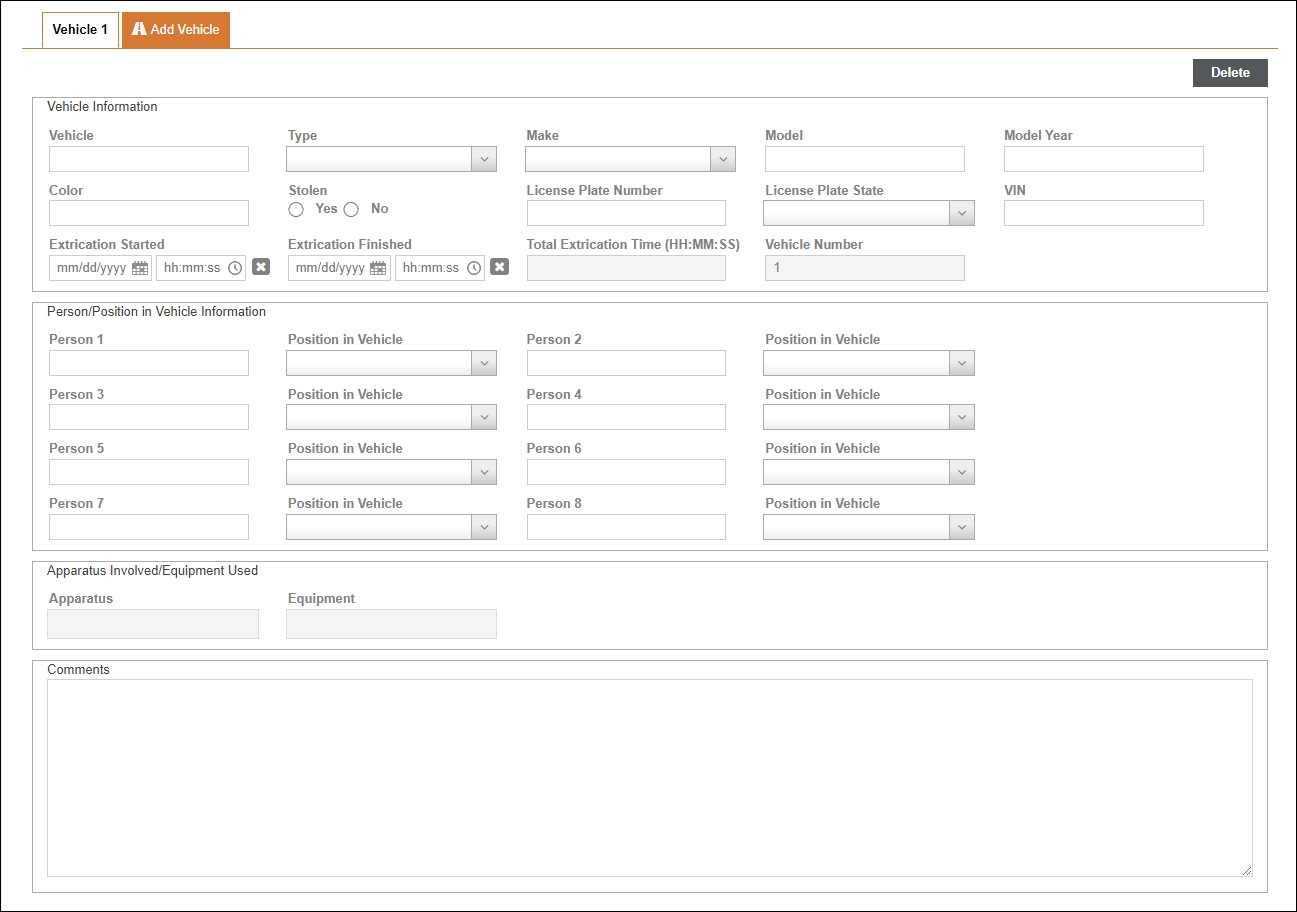
The Extrication tab will be enabled if you set the Extrication toggle on the Basic tab to ON. If an extrication was performed, document details about the vehicle(s), the person(s) and their position(s) within the vehicle, and any equipment or apparatus used. Click Add Vehicle to document multiple vehicles.
Note: The Apparatus section on this tab allows you to select any Apparatus listed on the Apparatus & Personnel tab and then record the equipment used from each Apparatus during the extrication event.
If your Apparatus has a configured inventory, you can see the number of each piece of equipment and can note the quantity used and deduct that quantity from the total.
Note: At this time, inventory assigned to a compartment on an Apparatus will not display on the Inventory tab. Items must be associated with the Apparatus itself and not its compartments.
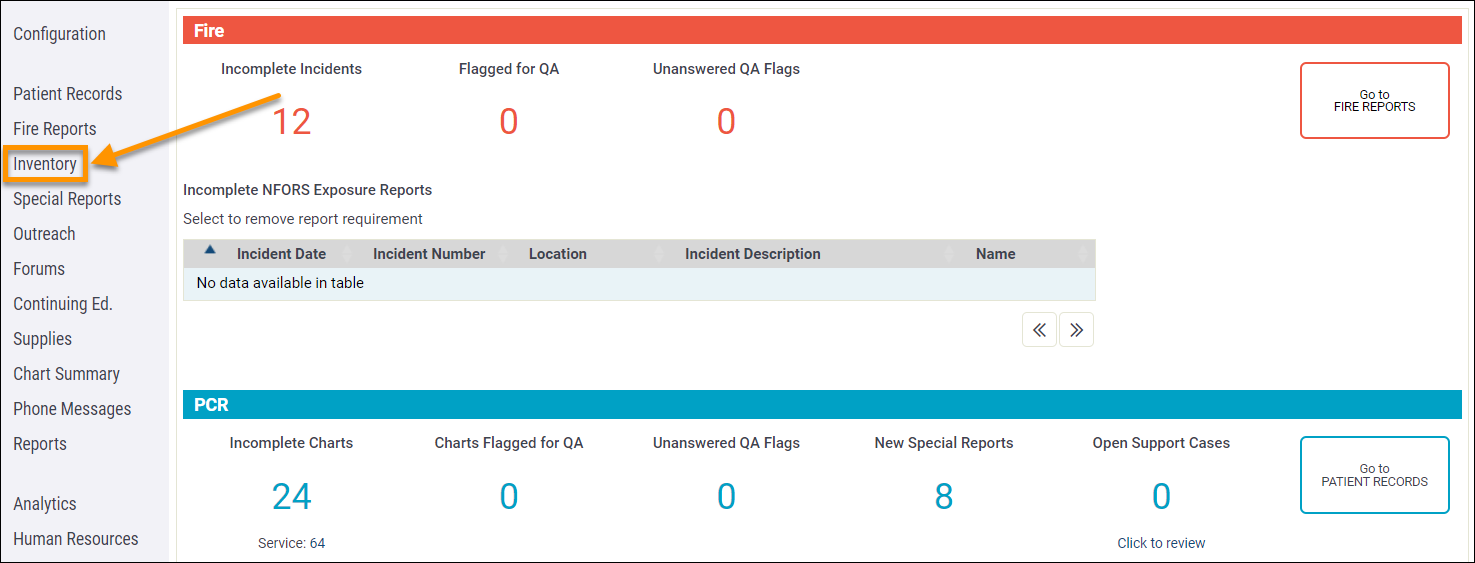
Configuration: ZOLL emsCharts > Inventory
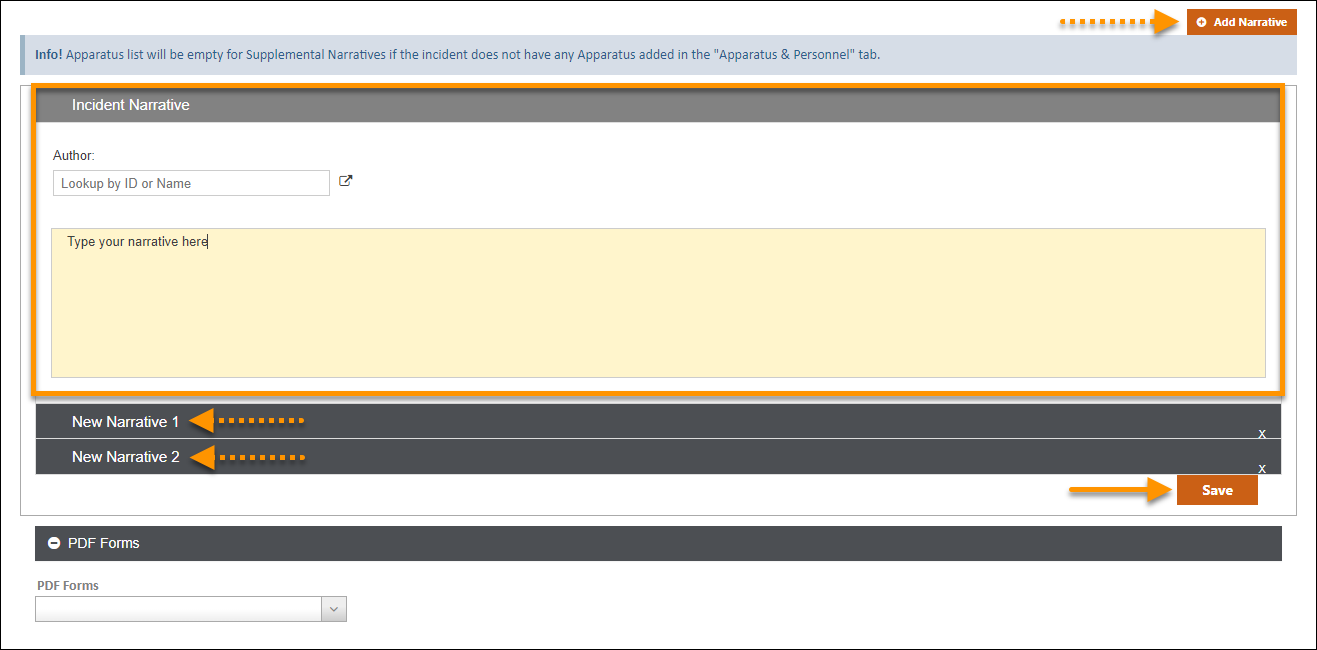
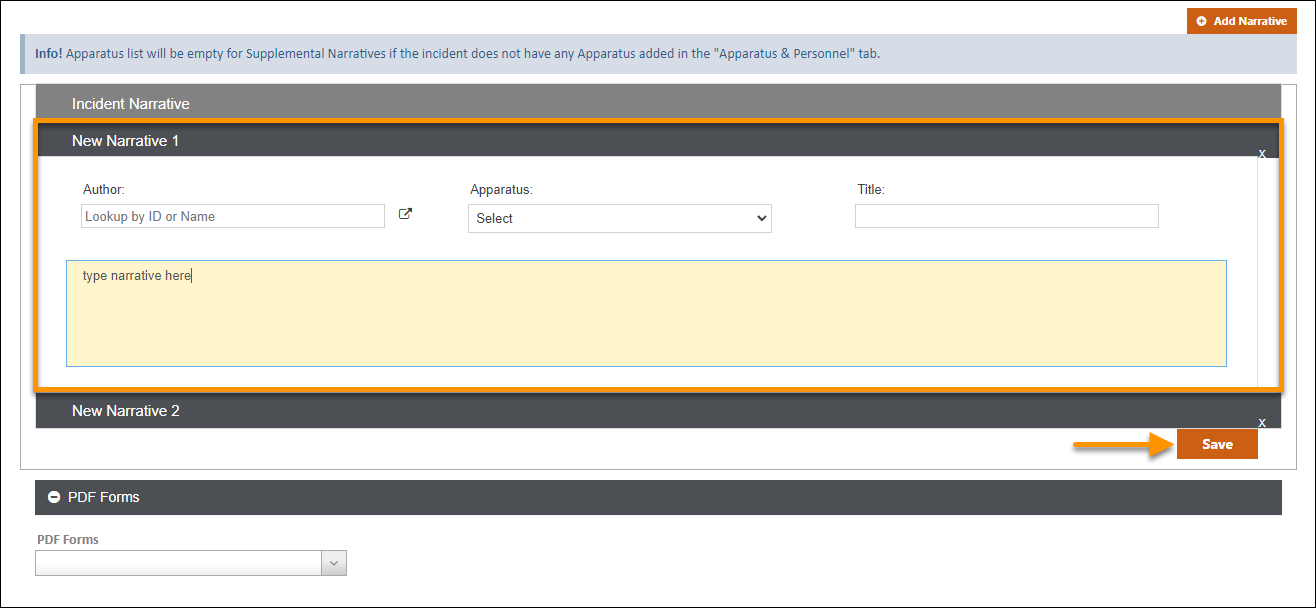
Type a narrative for the Incident on the Narratives tab. You can lookup the personnel entering the narrative in the Author field. You can add supplemental narratives by clicking Add Narrative. You can also add multiple supplemental narratives for each Apparatus listed on the Apparatus & Personnel tab. Click on the heading of the supplemental narrative to expand it and select the Author and Apparatus, then type in your comments. To remove a supplemental narrative, click the X in the header of that narrative. Make sure to click Save after updating any of your narratives to save your changes.
If your administrator has configured any PDF Forms for your Service, you can select them from the PDF Forms drop-down.
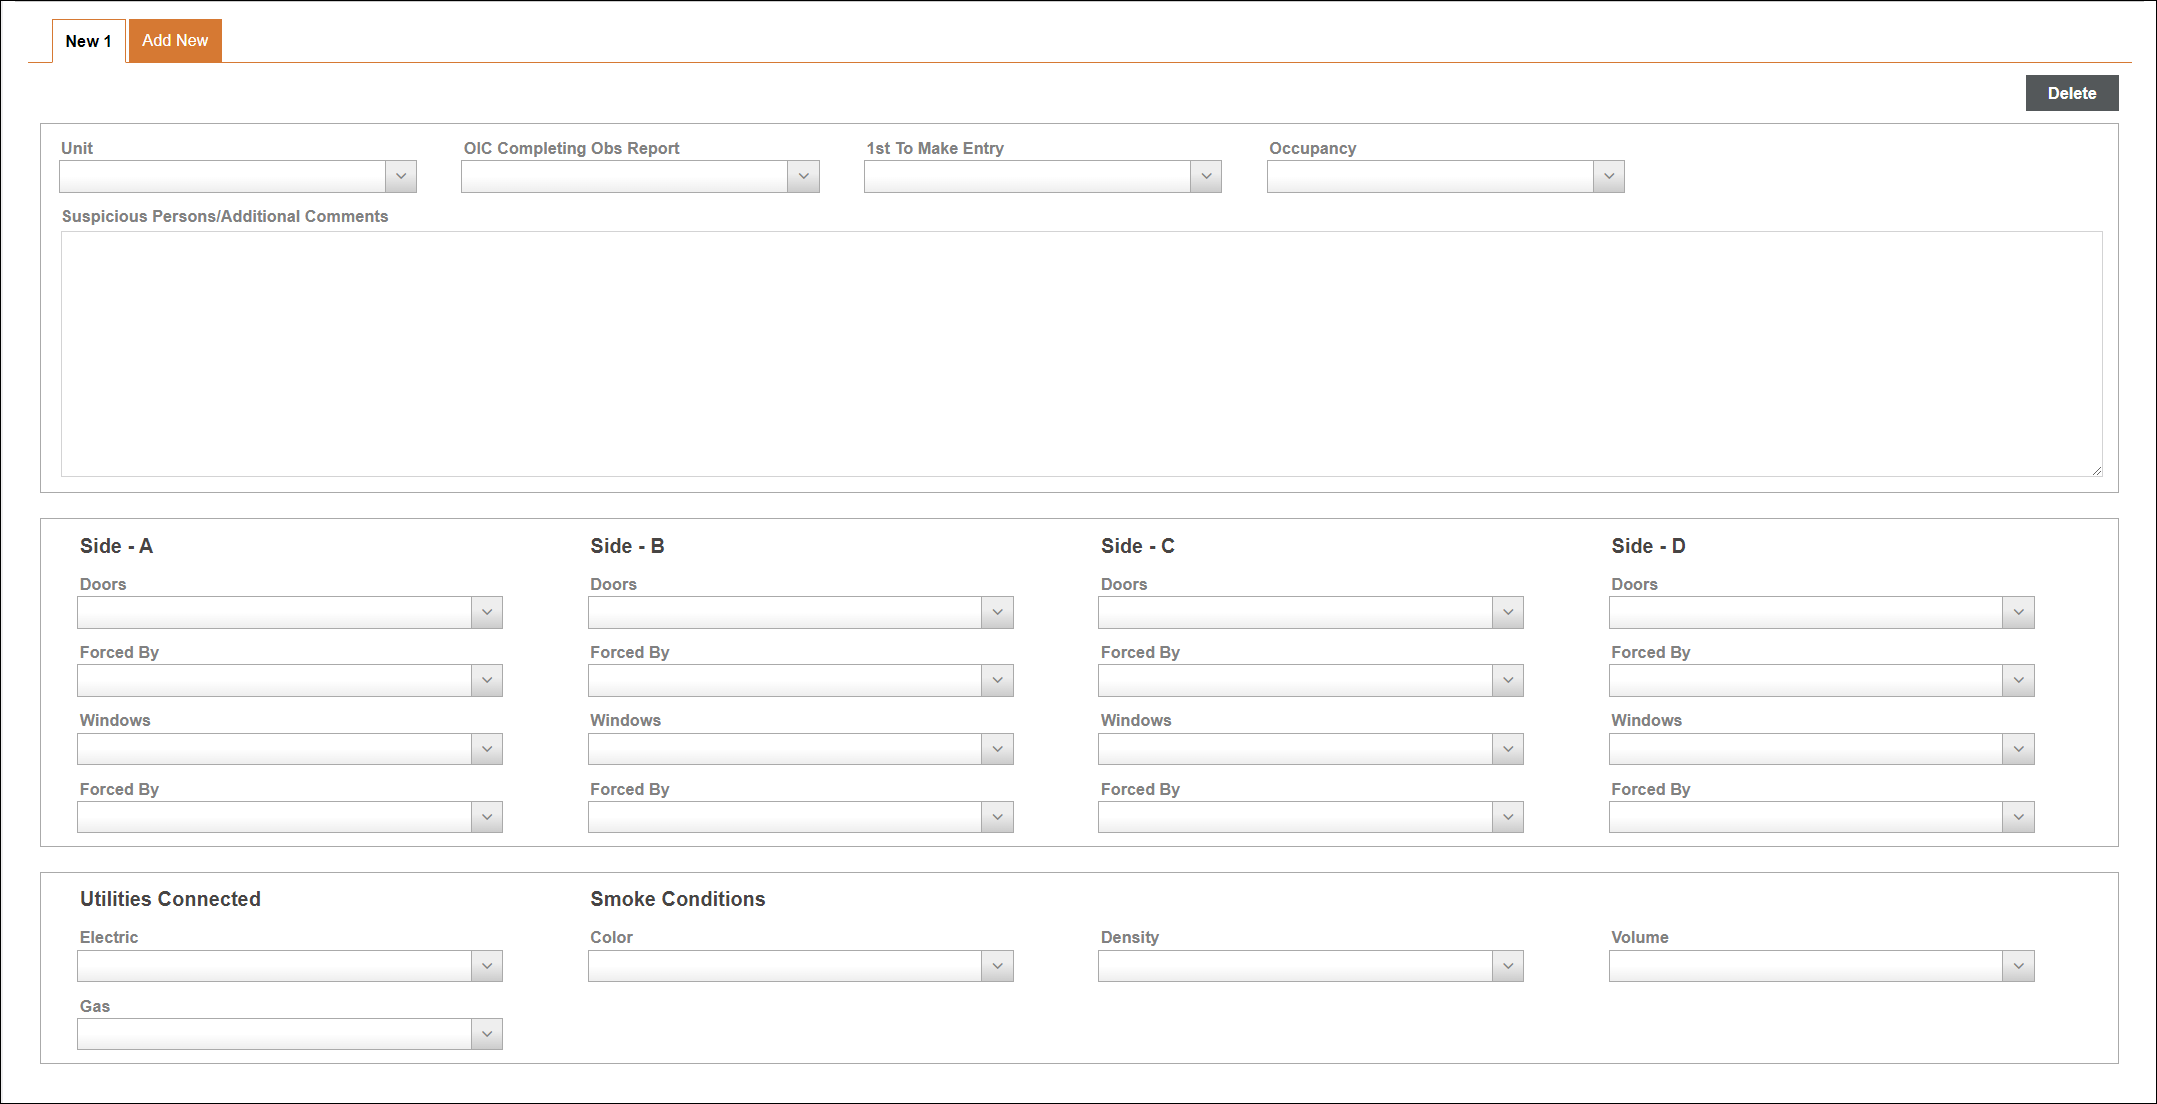
The Observations tab is used to record various observations and activities related to fighting a building fire. Any Apparatus and Personnel documented on the Apparatus & Personnel tab are available for selection on the Observations tab. You can document multiple sets of observations by clicking Add New. The following types of data can be documented on the Observations tab:
-
Unit: the unit the Observation Report is for.
-
OIC Completing Obs Report: the Officer in Charge who is completing the Observation Report.
-
1st To Make Entry: the first Unit that entered the building.
-
Occupancy: was the building occupied?
-
Windows and Doors: record whether the windows and/or doors were locked, unlocked, needed to be forced open, etc. If any windows or doors needed to be forced open, document the name of the person who forced it open.
-
Utilities: were gas or electric services connected?
-
Smoke Conditions: what were the smoke conditions (color, density, and volume) encountered while fighting the fire?
-
A free-text comments field is also available.
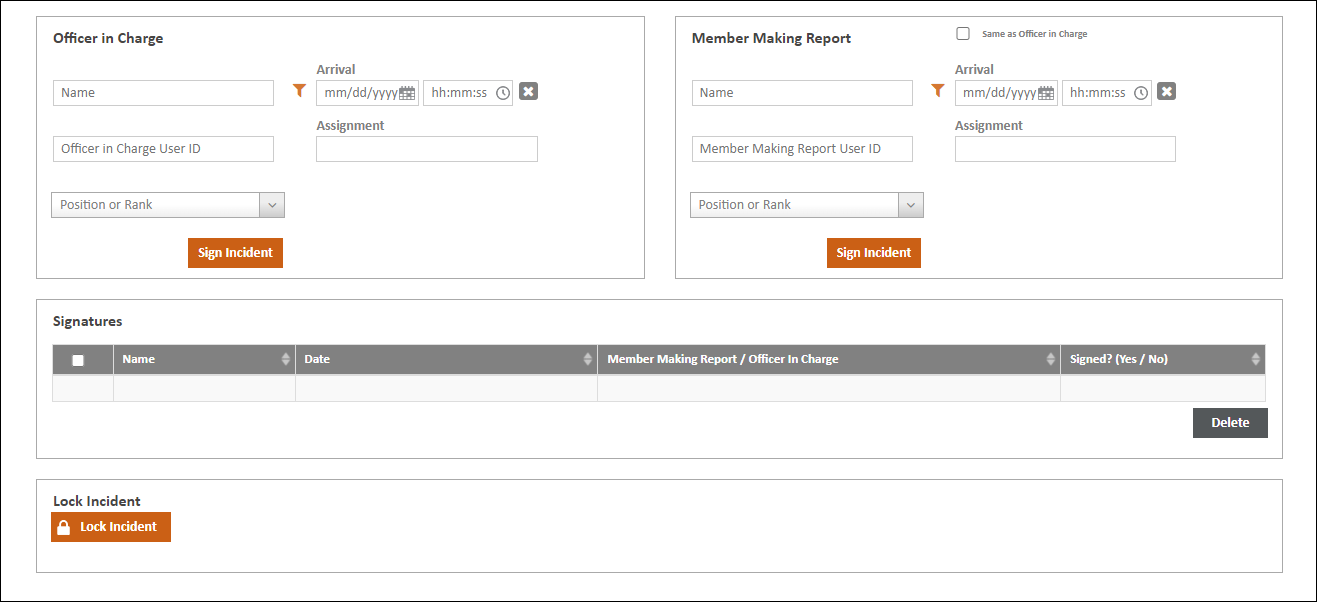
Document the Officer in Charge and Member Making Report. Click Sign Incident to collect a signature for that person. Once you have collected the signatures you need, click Lock Incident to complete the Incident Report.
Notes:
-
Once you have locked an Incident Report, it is considered complete and no longer editable. You must satisfy any Data Validation errors before you can lock your report.
-
When signing an Incident, only Personnel documented as a crew member or as reporting to the fire station will be available for selection. To sign-off on an Incident Report, Personnel must have the Enable Incident Sign-off security permission.
Configuration: ZOLL emsCharts > Configuration > Service > Code Tables > Security Roles > [select Security Role] > Fire Reports - NFIRS > Enable Incident Sign-off
Next, learn about Data Validations.


